
How to Cook the Perfect Duck Breast
This duck breast recipe gives you crisp golden skin and tender, juicy meat using a simple method that works every time. It is simple to learn, quick to prepare, and delivers a restaurant-quality result with only a few steps.
Duck breast tastes incredible when cooked properly, and this process makes it easy even if it is your first time cooking duck.
Ingredient Notes
- Duck Breast: Choose a fresh, good quality duck breast with the skin on. Scoring the fat is important because it helps the fat render evenly, prevents the skin from shrinking in the pan, and allows the skin to stay flat so it makes proper contact with the heat. This gives you a crisp, golden skin while keeping the meat tender and juicy. Make shallow cuts and avoid cutting into the meat.
- Salt: Use plenty of salt on the skin side. Salt draws out moisture, which helps the skin dry and crisp as it renders. Salt also seasons the fat between the scored lines. Massage it into the cuts for even coverage.
- Black Pepper: Only season the meat side with pepper. Pepper on the skin can burn during searing, which affects both flavor and appearance.
How to Make Perfect Duck Breast
Score and Season the Duck
Pat the duck breast dry with paper towels. Using a sharp knife, score the skin and fat in a shallow diagonal pattern, being careful not to cut into the meat. Season the skin side well with salt, rubbing it between the scored lines. Season the flesh side lightly with black pepper.
Preheat the Oven
Set the oven to 395°F (200°C). The duck starts on the stove and finishes in the oven for even cooking.
Render the Fat
Place the duck breast skin-side down in a cold cast iron pan. Starting cold helps the fat render slowly and evenly, which gives you crisp skin instead of chewy skin. Turn the heat to medium and cook for 3 to 4 minutes, or until the skin is golden brown and a good amount of fat has rendered out.
Sear the Meat Side
Flip the duck breast and sear the flesh side for 30 to 40 seconds to lightly caramelize the surface.
Drain the Fat
Remove the pan from the heat and carefully pour the rendered duck fat into a heatproof container. Reserve it for cooking potatoes or vegetables later. Duck fat adds incredible flavor to anything it touches.
Finish in the Oven
Flip the duck back to skin-side down and transfer the pan to the oven. Cook for about 6 minutes or until the internal temperature reaches 137°F (58°C) for medium.
Rest and Slice
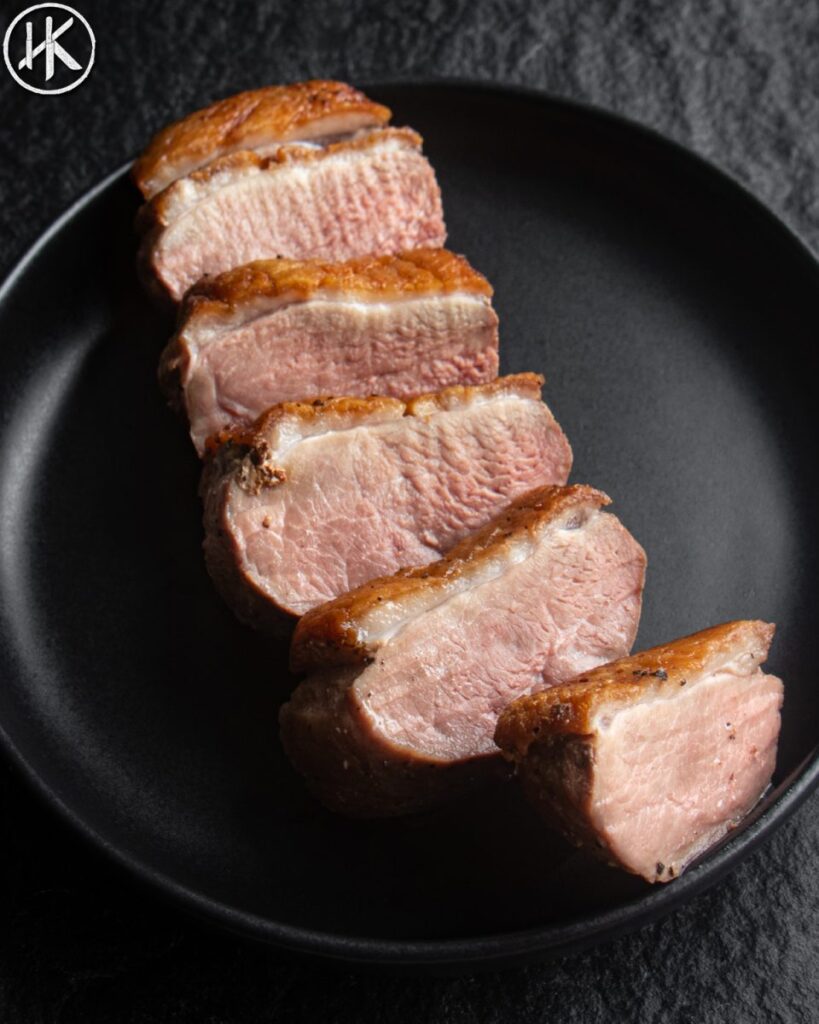
Transfer the duck to a plate and rest for 6 to 8 minutes so the juices redistribute. Slice thinly across the grain and serve warm.
Expert Tips
- Score the Skin Properly: Make shallow cuts through the skin and fat without reaching the meat. Scoring stops the skin and fat from tightening and shrinking as they heat, which keeps the breast flat and maintains full contact with the pan. This even contact is what allows the skin to crisp evenly.
- Start the Duck in a Cold Pan: Lay the duck breast skin-side down in a cold, dry pan, then turn on the heat. As the pan slowly warms, the fat begins to melt and render out gently. This creates a shallow layer of duck fat in the pan, which then acts like a shallow fry for the skin.
- Render on Medium Heat: Keep the heat at about medium while the skin side cooks. If the heat is too high, the skin will brown quickly on the surface while the fat underneath stays thick and does not have time to melt properly.
- Use the Right Pan: A heavy cast iron or other oven-safe pan gives you steady heat on the stove and can go straight into the oven to finish cooking. That means you can render, sear, and roast in one pan, which keeps the cooking even. If you are using a non-stick pan, only use it on the stovetop, then transfer the duck to a preheated baking tray to finish in the oven.
- Use a Thermometer for Doneness: Duck breast moves from perfectly cooked to overdone very quickly, so a thermometer is the most reliable way to check doneness. Aim for 125°F (52°C) for medium-rare or 137°F (58°C) for medium. Anything in this range will give you tender meat with a blush of pink. Avoid going much higher or the meat will begin to lose moisture and become firm.
- Rest Before Slicing: Let the duck rest for 6 to 8 minutes after cooking. During resting, the juices redistribute back through the meat. If you slice straight away, those juices run onto the board instead of staying in the slices, and you end up with drier duck despite cooking it correctly.
- Save and Use the Duck Fat: Pour the rendered duck fat into a heatproof container and keep it. Duck fat has a rich, savory flavor and a high smoke point, which makes it ideal for roasting potatoes, cooking vegetables, or frying eggs. Using it in other recipes is an easy way to carry that duck flavor into the rest of the meal.
Storage and Leftovers
Refrigerator
Store leftover duck breast in an airtight container for up to 3 days. If you are preparing it ahead of time, keep the duck breast whole rather than slicing it. Whole pieces hold onto moisture better and reheat more evenly.
Freezer
Cooked duck breast can be frozen for up to 3 months. Wrap the whole breast tightly in plastic wrap, place it in a freezer-safe container, and thaw it in the refrigerator before reheating. The texture will remain good, though slightly less tender than when freshly cooked.
Storing Duck Fat
Strain the rendered duck fat through a fine sieve into a heat-safe container. Let it cool completely before refrigerating. Duck fat lasts several weeks in the refrigerator and can be frozen for several months.
Reheating Duck in a Skillet
Warm the duck gently in a skillet over low heat, skin-side down. This reheats the meat without overcooking it and helps the skin regain some crispness.
Reheating Duck in the Oven
Place the duck on a baking tray and heat at 300°F (150°C) until warmed through.
Reheating Duck in the Microwave
The microwave softens the skin and can dry the meat, so it is not the preferred method. If you need a fast option, place the duck in a microwave-safe dish, cover it, and heat for 30 seconds at a time until hot throughouh.
More Recipes You May Like:
How to Cook the Perfect Duck Breast
Equipment
- Sharp knife
- Cast-iron or oven-safe sauté pan
- Tongs
- Meat thermometer
Ingredients
- 1 duck breast
- Salt to taste
- Pepper to taste
Instructions
Score and Season the Duck:
- Pat the duck breast dry with paper towels. Using a sharp knife, score the skin and fat in a shallow diagonal pattern, being careful not to cut into the meat.
- Season both sides of the duck generously with salt. Massage the salt into the skin and between the scored lines. Season the meat side lightly with black pepper.
Preheat the Oven:
- Set the oven to 395°F (200°C). You’ll start the duck on the stove and finish it in the oven.
Render the Fat:
- Place the duck breast skin-side down in a cold cast-iron pan. Starting in a cold pan allows the fat to slowly render out. As it renders, the skin sits in that fat and cooks until it becomes crisp and golden.
- Turn the heat to medium and cook for 3–4 minutes, until the skin is golden brown.
Sear the Meat Side:
- Flip the duck breast and cook meat-side down for 30 to 40 seconds. You only want the meat side to lightly sear.
Finish in the oven:
- Flip the duck back to skin-side down. Place the entire pan into the preheated oven and cook for 6 minutes.
- If your pan is not oven-safe, transfer the duck to a preheated baking tray, skin-side down.
- After 3-5 minutes, check the internal temperature. Look for 137°F (58°C) for a perfect pink center. Return to the oven if needed for the remaining time.
Rest the duck:
- Remove the pan from the oven and lift the duck breast out onto a plate. Pour the rendered duck fat from the pan into a heat-safe container and save it for cooking. Let the duck rest for 6 to 8 minutes.
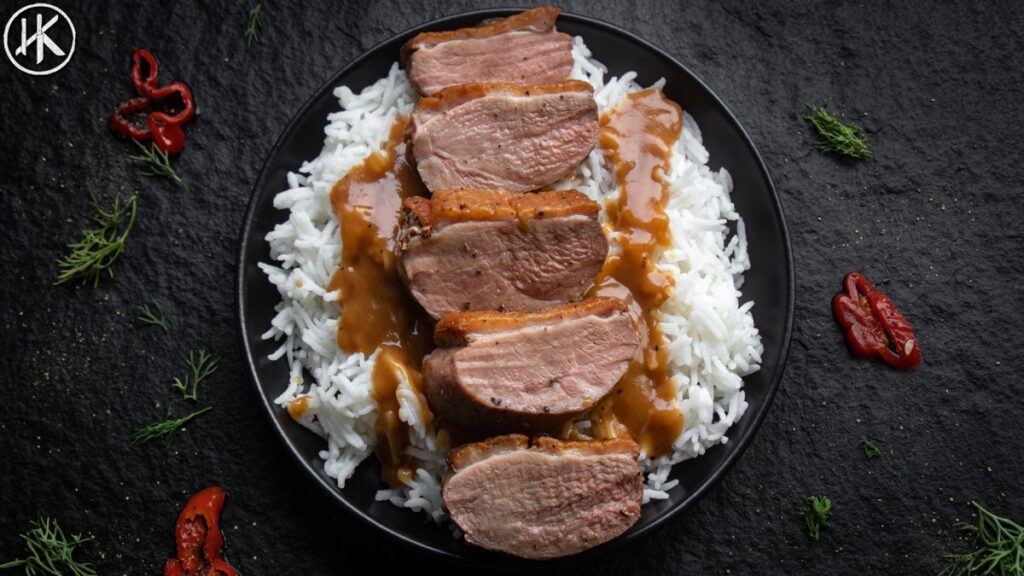
Slice and serve:
- After resting, slice the duck breast and serve with your choice of sides or sauce.
Notes
- 125°F (52°C) for medium-rare.
- 137°F (58°C) for medium.
- 145°F (63°C) for medium-well.
I tried this recipe, and it was really good, but I have questions I want to ask; how can I reach you?
hey so glad you liked this recipe. You can email me or just leave your questions here. There is a contact me form on the website.
My wife & I love duck breast. I’d been looking online for a good recipe and came across Headbanger Kitchen after checking St. Google for suggestions. Reading Sahil’s hearty recommendation not to over cook the meat told me he respected the duck. Personally I say it’s criminal to toast the flavor out of any meat. For example I came across a Tyson Foods recipe recently that recommended baking their tiny 1 to 1.5 lb Cornish Hens for an hour at 350F. Yuck! That’s how to make a rubber hen, not a succulent bird. Back to this recipe: I tried it last week and it came out deliciously mouth watering so I’m back today to double check his recipe because duck on the menu again. Yum!
thank you so much! Very grateful!
Perfect!!!
The thick layer of fat on duck and goose breasts is not to fuel their migration; it’s to make the duck more buoyant and insulate their bodies when they are resting on cold water or ice. Their bodies are also able to slow blood flow to the legs and feet in order to conserve heat. Domestic ducks are bred to take advantage of this evolutionary feature.
thanks for that nugget of information!
I tried your method for cooking duck breast, and it turned out amazing! The skin was perfectly crispy and the meat was so tender. Thank you for the clear instructions and tips! I can’t wait to try more recipes from your kitchen.
Thank you! I’m so glad to hear that!
Have tried several very highly-rated duck breast recipes and none of them produced successful results – yours was perfect! I did rub some chinese 5-spice along with the salt into the skin, and it required 7 min in my oven to reach desired temp, but your method was perfection. Will be on repeat!
This was such a helpful guide! I’ve always found cooking duck breast intimidating, but your step-by-step instructions made it seem so doable. I can’t wait to try the crispy skin technique you described. Thanks for sharing your tips!
My pleasure!
Wow I can say as a chef you are amazing, because your instructions are so good and understanding. I’m glad I found you. You are really the best of the best !!!! 😎😎😎👏👏👏👏
thank you so much!
This post was incredibly helpful! I’ve always been intimidated by duck breast, but your step-by-step instructions made it seem so manageable. I can’t wait to try out the crispy skin technique. Thanks for sharing!